We interrupt our regularly scheduled programming to bring you this breaking news… Truly. I was going to write a post on Team Topologies I read for an upcoming book club . Now, that will be pushed to next week. :)
Preconditions
Our hot water heater had stopped working, and we were thinking it was probably the heating element. I got some advice to at least call a plumber and see what they would charge since it was a bit tedious to do the repair. When the plumber came out, he also checked the house’s water pressure. It was around 95 PSI when it should have been under 80 to prevent damage to the interior plumbing. We knew we wanted the hot water heater fixed, and the water pressure issue seemed to be a problem waiting to happen if not addressed.
ROI Analysis
The quote came back later that day at $984 for hot water heater repair, expansion tank replacement, and pressure reducing valve replacement. Add on another $225 for a second expansion tank replacement in the crawlspace, and that puts the total to $1,200.
My initial estimate for the DIY route was $230 in parts and $110 in tools for a savings of around $850. That included a splurge on a not-completely-necessary Klein clamp multimeter . I wanted to verify the hot water heater was turned off without touching it with voltage probes since it runs on 240 volts and I wanted to be super careful. I could have bought a $10 clamp ammeter at Harbor Freight, but I took the opportunity to upgrade my Amazon multimeter to a nice Klein that can also measure DC amperage with the clamp. That might prove useful for some future ham radio projects.
Risk Analysis
I was well aware of how damaging water can be to a house, so part of the condition for taking on this plumbing project was ensuring limited damage potential if a small leak happened in the garage or crawlspace. I hedged my bets by building a gallon drain bucket with a hose attachment at the bottom like a rain barrel. I didn’t know how much would be left in the pipes after running the faucets and hose spigots dry. Theoretically, this would allow me to drain an unlimited amount of water from the pipes. Little did I know the magnitude of what would transpire!
Once I felt prepared on the electrical safety and water drainage fronts, I was ready to go.
Implementation
I split the project into three phases: hot water heater, pressure reducing valve, and expansion tanks. I tried to do them when my wife and kids were out of the house since the tasks all involved turning off the whole house water supply.
The hot water heating element replacement went smoothly. I had done my research ahead of time and bought a purpose-built heating element wrench . The elements were torqued in to prevent leaks, so the wrench was necessary to get leverage in the tight space. A monkey wrench or channel lock pliers would not have been successful. I got a decent bit of sediment out of the tank when I drained it. I read that if you drain the tank regularly, removing sediment is good. However, if the tank has not been drained in a long time, removing sediment can actually weaken the walls. Since this hot water heater was just 4 years old, hopefully we’re on the good side. I replaced the elements with low watt density models that folded back for more surface area. Dispersing the same wattage of heat over more surface area should give the elements longer service life.
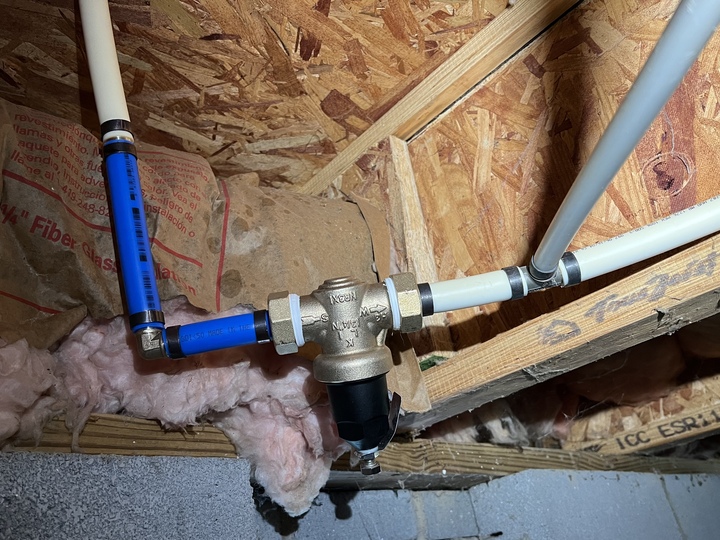
Next up was the pressure reducing valve. This project had a couple of starts and stops. I originally replaced the valve using the fittings from the old one. Nice and simple! However, when I turned the water back on, I saw a drip every 2-3 minutes. This had been happening on the old valve and I think was the root cause for the adjustment bolt rusting over. I went to Lowest to get a PEX crimp tool , pipe, and a straight coupler. After verifying the ring didn’t just need another crimp, I turned the house water off again and disassembled everything. I tried to stage it all up with the new pipe section and new couplers, but the strain was just too much. To avoid yet another trip to the hardware store, I got out my heat gun to see if that would help me bend the PVC . It didn’t work as well as that guy, so I just went back out to get a 90 degree coupler. After installing that, I had perfect strain relief. Another perk was that 90 degree elbow ended up being the low point of the pipe on that side. If there was a drip in the future on that side, it would run with gravity away from the valve instead of over it.
Last phase to go - expansion tanks! These were lower priority than the hot water heater (ASAP) and pressure reducing valve (as soon as convenient.) I had already filled the expansion tanks to 60 PSI to match the pressure after the pressure reducing valve. Laura and the kids were gone one night at Vacation Bible School at her parents’ house, so I used that opportunity to finish my project. I went to taekwondo after work from 5:00-7:00, was home by 7:30, and had eaten dinner by 8:00. The hot water heater expansion tank was a breeze. I just had to shut off the cold side valve of the hot water heater, drain the hot from the faucets, and drain 30 seconds out the hose attachment at the bottom. That tank was still good since it was holding air pressure, but I figured since I had bought the part and taken the old one off, I would stick with the plan. I told myself once I was done with this project I’d have a basically refreshed hot water and pressure regulation system.
At this point in time, it was 8:45 and I was pretty tired. I thought about calling it a night, but I really didn’t want to drag the project on when I had the chance to finish it with just one more replacement. The hot water heater expansion tank was so easy that I just had to finish the other one out… So I went for it. I turned off the whole house water shutoff from inside just like before when I was working with the pressure reducing valve. This one was a bit of a struggle to get taken off. There was a metal strap wound around the tank to support it, and the ~22lb weight of the filled 2 gallon tank on its side was not spinning freely. I would unscrew it about an eighth of a turn, lift it up to allow the support to uncoil, and then reposition the wrenches for another turn. This was relatively tiring due to the positioning in the crawlspace and the weight of the tank. Finally I get it off, and water starts spurting out of the pipe! This was not what I had expected. Everything inside the house and both outdoor spigots had zero pressure. I did not anticipate it, but evidently this was upstream of the indoor whole house shutoff. That meant it was above the pressure reducing valve, so I had a 3/4 pipe flowing at over 100 PSI. Not good. It was filling up my 5 gallon bucket much faster than the non-pressurized hose exit port was draining. I had another mop bucket that I was crab-running back and forth to the crawlspace exit while I was trying to think about what to do next. After a couple minutes of doing the same thing and seeing the same results (that not-Einstein quote), I figured it must be a live pipe and not any type of drainage. I grabbed a wrench and ran up to the road to shut off the water main. Thankfully that worked! I went back under the crawlspace and sat in the water for a minute to recover. Thankfully the water main valve was good and fully shut off the water so I could get the new expansion tank put on. I couldn’t get the steel pipe hanger to loop over on itself for a friction fit quite the same way as it had before, so I tied a wire around it and the pipe to keep it positioned in the correct spot. Turning the water back on and verifying no leaks was completed by 10:30. At this point, the crawlspace had a large amount of water in it. If I caught half of the water in the buckets, there was probably 25 gallons on the floor. Some had run between the plastic sheets into the ground, but the majority was sitting on the plastic sheets. I spent the next two hours using beach towels to clean up that mess. It turns out the expansion tank under the house had gone bad and the bladder completely filled with water. That was a small consolation that the mess I caused was somehow worth it.
Reflections
Clean up your mess! Don’t let someone else (or your future self) bear the consequences of your learning and experimentation. I spent two hours sopping up standing water on the plastic sheets in the crawlspace to avoid mold. In software engineering, be sure to follow up and clean up any technical debt or adverse downstream effects that your experiment caused.
I had some ah-ha moments during my research for this process. I have heard the voltage is water pressure and amps are volume of flow analogy before. One youtube video talked about water flow vs pressure and how reducing water flow by halfway shutting a cutoff valve does not actually solve the pressure problem. There has to be a pressure reducing valve to drop pressure from the street level to the necessary house level. It was neat to hear the applicability of those physics concepts in their native domain besides just an analogy for something else.
I spent roughly 15 hours on this project: 4 for hot water heater elements replacement, 7 for the pressure reducing valve replacement, and 4 for replacing the expansion tanks. I could have hurried more but tried to take it at a measured pace and not rush. I ended up spending about $500 including the additional PEX piping, adapters, and crimp tool. This resulted in a final savings of $700 our an hourly rate of $45. It took longer than expected, but the cost savings was only one goal. The other desire was learning more about how things work and setting myself up with new skills for the future. The project definitely fulfilled the learning objective, so I’m calling it a win.